Thank you for stopping by, grab a cup of coffee (or your beverage of choice) and stay awhile.

Friday, December 31, 2010

A Huge Thank YOU!!!!!

As this year comes to a close.( in Australia it is 2011 already).I reflect on this past year and thank God for all he has given me this past year.  I want to take this time to thank my friends and family for all their support in my endeavors this year.  I want to thank all my followers this last few months for your support.  I have met some wonderful women on this blog through Creative Every Day Month....I have seen some wonderful art, the talent out there is more then I could ever imagine.  I learned alot about true friendship this year as well....I have been hurt this year in many ways, but at the end of the day, I reflect on the beauty of it all and know that through the hurts I am a better person for it.  I truly hope this year brings you many Blessings and that what ever trials you have gone through that they can be left in 2010 and make 2011 the best year ever.
 
Thank you for your support

Love to you all
Sherry


Tuesday, December 28, 2010

Homemade Marshmallows


I’ve been wanting to make a homemade marshmallows for a long time now, but never really had a reason. I love marshmallows, but don’t eat them very often (but if I have a open bag in the pantry I will eat every last one) — store-bought Stay-Pufts (or their generic counterparts) are just not as pretty as the homemade ones I have seen in Williams Sonoma, with their weird, dry texture and powdery coating (they they were good in a cup of freshly made hot cocoa, but again that didn't stop me from eating them). And believe it or not, I’d never had a homemade marshmallow in my life.

After flipping through a handful of my favorite food blogs, past a billion fudge and holiday cake pop recipes, I came across a tutorial for peppermint marshmallows, on a great blog site. I’d found my project.

I started  researching homemade marshmallow recipes. They were all similar, for the most part, but there were some different aspects. Most importantly, some contained egg whites. Having never made homemade marshmallows, I’m certainly not an expert — but I’d never heard of adding egg whites to marshmallows. I decided to make two marshmallow recipes, one with whites, one without, to see if there was a big difference.

 Two Recipes go head to head: Homemade Marshmallows

The first recipe I made was Alton Brown’s from the Food Network which did not use egg whites. This recipe was REALLY sticky and I got marshmallow everywhere, but the finished product was tender and puffy; not as springy as the ones you get from the stores. What I liked best about this recipe is that the marshmallows were moist, not like the parched, cottony ones I’d grown up with (but again I still ate them).

The second recipe was from Gourmet Magazine, which used egg whites to add a little more airiness to the finished product. The reviews on this recipe promised fluffy, flavorful marshmallows and it delivered. Adding egg whites didn’t make a huge difference to the level of puffiness in my homemade marshmallows, but they were very good regardless. These too were tender and moist.

Which Marshmallow Recipe Won you may ask?

If I had to pick a favorite from these two recipes for homemade marshmallows, I’d have to say that I liked the Gourmet recipe best. It wasn’t necessarily more light and airy, but with the addition of the egg whites, these homemade marshmallows had a better, firmer texture, and were less sticky than Alton’s version. 

If you’re not careful when making marshmallows, it gets everywhere. You’ll find marshmallow on your clothes, in your hair, and stuck to the counter, cabinets, and sink. There’s no way around it, really, unless you’ve got some serious marshmallow making skills. I defiantly don't have the skill.

After looking around for a healthier version... I found this recipe using a healthier sweetener – brown rice syrup – instead of corn syrup, though you’re free to use whichever you have on hand. Of course I favor my own over the two above, but I invite you to try them all you will pick your favorite!

Coat your marshmallows with powdered sugar and cornstarch, or they will stick to everything in sight.

Homemade Marshmallow Recipe

Yield: about 36 marshmallows

Ingredients

  • 2 tablespoons vegetable oil
  • 1 cup powdered sugar
  • 1 cup cornstarch
  • 3 tablespoons unflavored gelatin (just under four envelopes)
  • 1/2 cup very cold water
  • 1 1/2 cups granulated sugar
  • 3/4 cups brown rice syrup or corn syrup
  • 1/2 cup warm water
  • 1/2 teaspoon kosher salt
  • 2 egg whites, at room temperature
  • 1/2 teaspoon vanilla
1. Grease the inside of a 9″ x 9″ baking pan. In a bowl, mix powdered sugar and cornstarch until well blended. Coat the inside of the greased baking pan with 1/2 cup of the sugar and cornstarch, reserving the remaining amount for coating the finished homemade marshmallows.

2. Pour the cold water into the bowl of a stand mixer and sprinkle gelatin onto the surface of the water. Set aside.
3. In a heavy, high-sided pot, combine granulated sugar, brown rice or corn syrup, warm water, and kosher salt. Heat over a low flame and stir until sugar is completely dissolved. Turn heat up to medium and continue to cook, without stirring, until the mixture reaches 240 degrees on a candy thermometer. The sugar will bubble up, but if you’ve got it in a pot with high sides, it shouldn’t boil over. If it threatens to escape, remove the pot from the heat for a few seconds and stir the contents before returning to burner.

4. Once the sugar reaches 240 degrees, remove from heat. Immediately pour into gelatin and beat with a stand mixer using the whisk attachment until it becomes white, light and fluffy, about 10 minutes. You can use an electric hand beater, but it will take longer to fluff up, about 15-20 minutes. If you use a hand beater, be aware that the fluff will try to crawl up the beaters in its attempt to make a mess. Once done, the marshmallow fluff will have nearly tripled in bulk. Add vanilla and beat until well integrated into the fluff.

5. Beat egg whites in a small bowl until they reach stiff peaks. Scoop the whites into the marshmallow fluff and beat just until combined so that you don’t flatten the whites. 

6. Pour marshmallow fluff into the prepared pan and use a greased spatula to smooth out the top. Sift cornstarch and powdered sugar mixture onto the top to completely cover the marshmallows, and leave to sit over night, uncovered, to stiffen up.

7. Once the marshmallows have firmed up, cut them into 1″ x 1″ squares. Toss the individual marshmallows in a bowl of the remaining cornstarch and powdered sugar so that they are completely coated, otherwise they will stick to everything they come in contact with. You can also use sharp cookie cutters to cut out the marshmallows.

8. Store in an airtight container for up to 3 weeks.

You can dip them into chocolate as well...so YUMMY!

Cut them nice and small then add them to your hot chocolate.

Tuesday, December 21, 2010

Blog Hopping and Snowman Pops!!

I love to read others blog, I probable read about 20 a day, there are so many good recipes, ideas and writing. I came across this one blog that has so many great ideas with food.  I love snowmen so I thought I would share this idea that they had featured on their site. They are made with white chocolate and oreas, now I can't think of anything better then that.. head on over and take a look at this wonderful blog.

Created by The Idea Room
Have a great evening.

Sunday, December 19, 2010

Reflecting!

This time of year I reflect on my family, they all live on the west coast so I am not able to see them like I would love to.  Yesterday was my granddaughter 1st birthday and it makes me so sad that I had to miss it. So this post is dedicated to her and my other two sweet babies.  I worked this morning to put a collage of them together with one picture of me and two of my sweet grand kids.  I can't begin to express in words how much I love these babies.  Each and everyone brings such joy to me. I miss them more then words can say.
There is nothing like the love of a Grand child they capture you heart from the beginning. I love my daughters so much and they are the most wonderful beautiful girls in the world, but these sweet grand babies have captured my heart.

Thursday, December 16, 2010

Chocolate Rocky Road..YUM!

Doesn't this look yummy, I love chocolate and dried fruit, what a great combination.
Found this recipe by Jamie Oliver
I will be making this for Christmas gifts. It was a hit during a test run.

This is more for the adult candy eaters due to it's "secret" ingredient....a red chili pepper. Chocolate with a little bit of heat from a chili is my personal favorite! (or you can leave this out)

You can use any combo of fruit and nuts you like. I used cashews, pistachios, craisins and golden raisins. 
Chocolate Rocky Road

2 (4 oz) bars good quality bittersweet chocolate (70% cocoa solids)
1/2 fresh red chile, seeded and diced (or leave this part out)
1 heaping cup mixed unsalted nuts, such as almonds, hazelnuts, pistachios, or pecans
1 tablespoon sunflower or pumpkin seeds (optional)
3/4 cup mixed fruit, such as golden raisins, dried mango, dried sour cherries or cranberries, larger bits chopped

Preheat oven to 400 degrees.

Break up the chocolate and melt in a heatproof glass bowl over a saucepan of simmering water; don't let the bowl touch the water. Once the chocolate is melted, take the bowl off the heat and set aside. Meanwhile, put the chili on a cookie sheet with the mixed nuts and place in a hot oven for 5 minutes, until the nuts are toasted and shiny. When cool, mince the chili and rough chop the nuts and mix with the dried fruit in a bowl.
Save out a large handful of the fruit/nut mixture and set aside; add the rest to the chocolate. Stir everything until it is completely coated and spoon the mixture on a baking sheet lined with parchment paper and smooth out. Sprinkle reserved nut/fruit mixture on top and leave in a cool place for 30 minutes to set.

Once set, break up into large pieces and pile up on a serving plate or pile into gift bags....do this before it gets eaten up!

Tuesday, December 14, 2010

It is freezing..

I know so many more people are dealing with the cold this morning and even snow many inches deep.  But when your from Arizona, 18 degrees is beyond normal.  Yesterday the doors on the car where stuck.  I never owned a coat when I lived in AZ.  But now I have about 4, along with the gloves, hat and Uggs.  I figured if it is this cold at least show me some snow..(but I have my limits, maybe 2in most).
SO tell me in your comment, how much snow do you have right now, what do you have to do each day to get through the snow day.

These are pictures of the mountains of NC.


Here is another fun Blog Hop to join! Have fun with it, just make sure you do the following:
  1. Add your blog to the list. (NOT your giveaways please!)
  2. Grab our button & the link code to post on your blog
  3. Follow all 3 hostesses, as well as our special weekly co-host(s),  then as many other blogs as you would like. 
  4. After  you  follow a new  blog make sure you leave them a comment letting them  know  that you are  now a follower so that they can follow you back, and  please  follow  others back if they leave you a comment that they follow  you. 

Saturday, December 11, 2010

Great Gift for Christmas..

I have always loved homemade gifts and with this Christmas being a little tighter then past, I thought I would share this great Sugar Scrub gift for the girls.
 This can be made in less then 30mins.

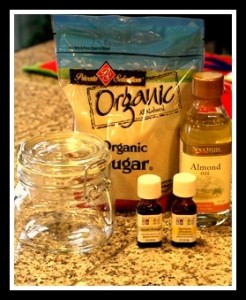
Items needed for making Sugar Scrub

  • Sugar – I used Organic sugar
  • Almond Oil
  • Essential oils – I used Orange because it’s the cheapest. I also used jasmine.(you can get these at Whole Foods or any other health food store.)
  • Glass Jar or plastic- I found mine at The Dollar Store, mason jars work great too.
  • Ribbon and tags
Combine 3 Cups Sugar with 1 Cup Oil. Drop in several drops of desired scented oil. Mix. Scoop into jar and seal.
I hope I gave you some quick, inexpensive ideas for the teachers in your life. For more daily inspiration, I hope you’ll visit Splendiferous Girls Artsy Ideas.

Wednesday, December 8, 2010

Splendiferous..

Today I wanted to use my chip board, I haven't worked with it in a long time.   I love this brand of chip art by Melody Ross, she is so inspiring.  I find many of her items at Archivers in Raleigh, NC. oh how I love this store. I wanted to incorporate something that had to do with my new venture. I added Splendiferous to the butterfly with stamped flowers on the edge..
I added some stamps and paint and a little glitter, what would a project be without glitter.
I decided to add a chain so I could hang it from the tree.

I started a new blog/business (I am still doing this one as well, it's an off shoot)..I have had a vision for a year now to start woman's weekend retreats in the mountains and beaches of NC combining Art, yoga, good food, laughs and stories.  A place to grow in art and self in a safe trusting environment.  I would love all your support.  Please visit my new site at
Splendiferous Girls Club


Thank you for all you support, please continue to visit this site as well.


Monday, December 6, 2010

Forgiveness..


As hard as it is to do, and even if it seems completely impossible, truly and fully forgiving others is necessary to feel at complete peace with yourself; holding onto past hurts or wrongs we feel were done to us, keeps us from what is truly out there waiting for us. Forgiving ourselves is equally important, and worth any work it takes to do it.

Forgiving whatever has happened to you in the past and whoever was involved in this hurt does not mean you must agree with all that has happened. It does not mean that you are giving up. It does not mean that you are weak, wrong or that you are admitting fault in anyway. It just means that you are letting it go so that your hands are not so filled with past hurts that they can not grasp onto the goodness that God has waiting to be held by you. 

Forgiving yourself means that you are acknowledging that you may have chosen to do things differently, but that now you know better and you are treating yourself with kindness and moving forward in a new and better way.

Forgiveness is simply releasing all of the bitterness that builds up over time when we hold un-forgiveness in our hearts, when we refuse to forget, or beat ourselves up because we can not forgive our own mistakes.

Forgiveness is so beautiful and freeing. So worth it. Please just think about it. By forgiving others and releasing that burden you are giving others the opportunity to forgive you.

Saturday, December 4, 2010

New Site...


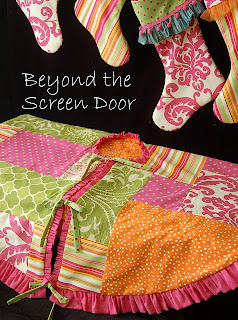
Beyond the Screen Door this is an online home decor store, I saw this on another blog and thought I would share it.  I love the colors how fun would this be to change up our stockings.


Love this tree skirt...
 
Check out this Christmas eye candy at Beyond the Screen Door!


Related Posts Plugin for WordPress, Blogger...